About a year ago I started to look at LEX – you know, the thing that powers ALEXa. I started to build a simple chat bot that could respond to simple queries. One thing led to another, and I also created a very basic Alexa Skill. After my initial development, I put it on hold, since there were more things to look at that felt more attractive.
After Re:Invent 2018, I watched a couple of Alexa talks on YouTube, and suddenly my interest to build voice-enabled applications was reborn.
There was a new SDK and development kit, and everything felt refreshed. I started to build a simple "Guess the number" skill to test the development kit and pick up where I left off. In this blog post, I will walk you through the creation of this skill and things to think about.
Configuring and creating the skill
To start creating a skill, we first need to... create the skill. It’s possible to use a configuration JSON file and set up everything using CloudFormation. I will, however, in this case use the Alexa console for creating and testing the skill.
Start by signing in to the Alexa developer console. If you don’t already have an account just sign up for one. It’s good to remember that if you already own a physical Alexa product, like the Echo Dot, and sign in with the same account in the developer console as you use for your Alexa device, your skills will automatically be available on those devices, which is great for testing.
When in the console, click the blue “Create Skill” button, give your skill a name and a default language. I will use the name Guess The Number and set the default language to English (US). Select to "Create a Custom Skill". Click "Create" and then select “Start from scratch”.
Configure Invocation Name
Now we need to give the skill an invocation name: click on “Invocation” in the menu and enter a name. This is the name we will use to tell Alexa to open our application,
“Alexa, open Guess the Number.”

Create slot types
So what is a slot then? Slots are the different kinds of input for your Skill. For example, if you would say, “Alexa, what’s the weather like in New York”?, here ,“New York” would be a slot, probably with the type AMAZON.US_CITY.
There are several slot types available for us to use, or we can create our own custom slot. In this example, we just used the built-in type AMAZON.NUMBER.
So add that by selecting slot types in the menu and clicking Add Slot Type button. Make sure to add an AMAZON.NUMBER slot type.

Create intents
Time to start creating our intents. Intents are the different kinds of actions that our skill support. Each intent is matched to a voice utterance. So when the user speaks to Alexa, the service will match the utterance spoken by the user to an intent in our skill.
There are several built-in intents like the AMAZON.YesIntent ,which would map towards a positive response like "yes", "ok", "sounds good". Beside the built-in intents, we can create our own custom intents. In this case we must supply the service with example utterances that can be used during matching. We don’t need to think of all of the utterances, but the more we supply, the better the model will be. Let us start by creating an intent that can be matched to the user guessing a number.
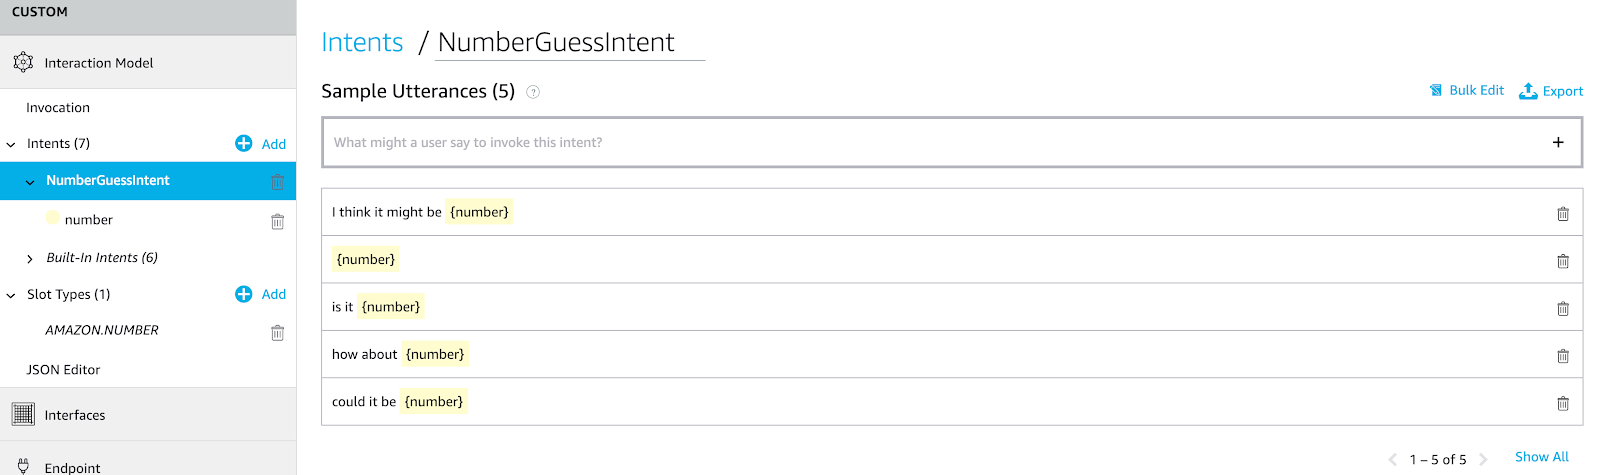
Start with the NumberGuessIntent. We will be using the slot that we defined earlier. We start by creating some sample utterances, like "could it be {number} here". {number} indicates the slot.
Next we add some built-in intents to handle some different scenarios like Help, Cancel and more. So let us add AMAZON.CancelIntent, AMAZON.HelpIntent, AMAZON.StopIntent, AMAZON.YesIntent, AMAZON.NoIntent, and AMAZON.FallbackIntent
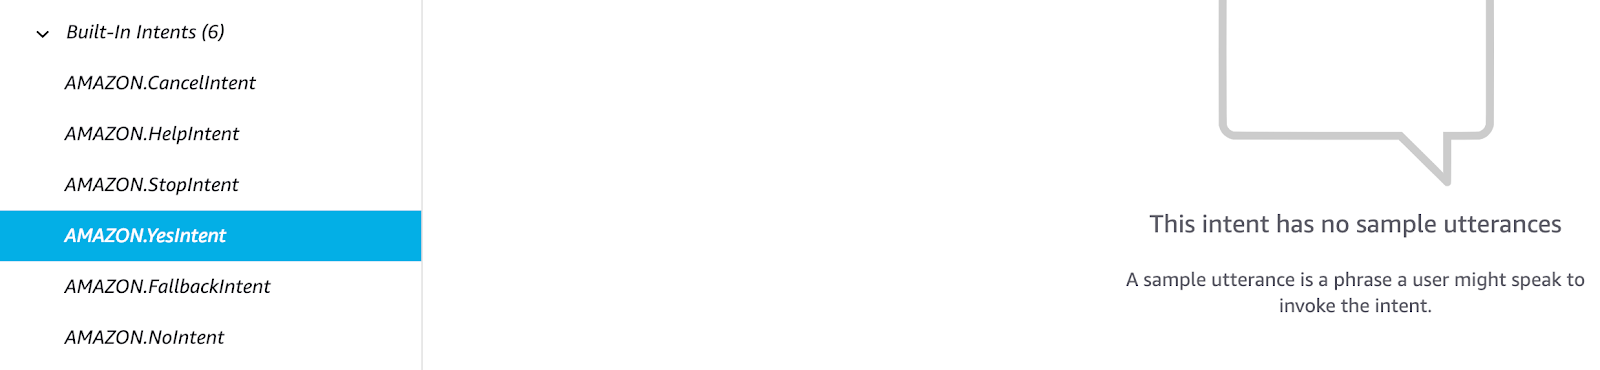
Most of them are self-explanatory, but the AMAZON.FallbackIntent can be a bit unclear. It helps us handle unexpected utterances, or when a user says something that doesn’t map to any intents in our skill. That way we can ask the user to repeat, or any other error message.
Set up the endpoint
The time has come for us to set up the endpoint that the Alexa service will call when our skill is triggered. I will use a lambda function as the endpoint, so before we do the actual setting up, we need to create the function.
Create the Lambda Function
Creating the Lambda function is done the normal way, with CloudFormation. So let us start with creating the function and then add the code we need.
Since we are going to persist attributes, the Lambda function needs to have permission to access the DynamoDB, so we start by creating the IAM Role we need.
AlexaSkillFunctionRole:
  Type: "AWS::IAM::Role"
  Properties:
    AssumeRolePolicyDocument:
      Version: 2012-10-17
      Statement:
        - Effect: Allow
          Principal:
            Service:
              - lambda.amazonaws.com
          Action:
            - sts:AssumeRole
CloudWatchLogsPolicy:
  Type: "AWS::IAM::Policy"
  Properties:
    PolicyName: AlexaGuessTheNumberCloudWatchPolicy
    PolicyDocument:
      Version: 2012-10-17
      Statement:
        - Effect: Allow
          Action:
            - logs:*
          Resource: "arn:aws:logs:*:*:*"
    Roles:
      - !Ref AlexaSkillFunctionRole
DynamoDbPolicy:
  Type: "AWS::IAM::Policy"
  Properties:
    PolicyName: AlexaGuessTheNumberDynamoDBPolicy
    PolicyDocument:
      Version: 2012-10-17
      Statement:
        - Effect: Allow
          Action:
            - dynamodb:CreateTable
            - dynamodb:DeleteItem
            - dynamodb:GetItem
            - dynamodb:PutItem
            - dynamodb:UpdateItem
          Resource: !Sub "arn:aws:dynamodb:${AWS::Region}:${AWS::AccountId}:table/guess-the-number"
    Roles:
      - !Ref AlexaSkillFunctionRole
With the IAM Role in place, we can create the actual Lambda function as well.
AlexaSkillFunction:
  Type: AWS::Serverless::Function
  Properties:
    FunctionName: alexa-skill-guess-the-number
    Runtime: python2.7
    MemorySize: 128
    Timeout: 10
    CodeUri: ./src
    Handler: handler.lambda_handler
    Role: !GetAtt AlexaSkillFunctionRole.Arn
    Layers:
      - !Ref AlexaSdkLayerVersionArn
The Alexa SDK (ask-sdk) is not available by default in Lambda, so we need to add it. I’m using layers to include the Ask SDK. Check out my previous post to see how to create a Lambda Layer.
The only thing left now is to make sure the Alexa service can call our function. When setting that up, we also want to make sure that it’s only this skill that can call us and not every Alexa skill. To do that, we need to get our Skill ID, which is found in the endpoint section in the left menu.

When we have the Skill ID, we can set up the permissions needed for Alexa service to call our Lambda function.
AlexaAskPermission:
  Type: AWS::Lambda::Permission
  Properties:
    FunctionName: !GetAtt AlexaSkillFunction.Arn
    Action: lambda:InvokeFunction
    Principal: 'alexa-appkit.amazon.com'
    EventSourceToken: !Ref AlexaSkillId
Time to start writing some code and implement our intents. I will be using Python and when we use Python we can implement the intents either by using classes or decorators. Here I will be using classes all the way. We need to implement two functions for each intent, can_handle and handle.
The can_handle function will determine if this class can handle the actual intent being triggered. The handle function would then be called if can_handle return true.
We start by implementing the LaunchRequestHandler. This will handle us saying "Alexa, open Guess the Number".
class LaunchRequestHandler(AbstractRequestHandler):

  def can_handle(self, handler_input):
      return is_request_type("LaunchRequest")(handler_input)

  def handle(self, handler_input):
      speech = "Welcome to guess the number. Would you like to play?"
      reprompt = "Do you want to play?"

      handler_input.response_builder.speak(speech).ask(reprompt)
      return handler_input.response_builder.response
The code above the can_handle function will check if the intent is the LaunchRequest and return true if it is.
Our handle function will then be triggered. By adding a reprompt message the session will be kept open, and if we don’t answer Alexa she will use the reprompt message to ask for an answer again.
It would also be possible to keep the session open using the set_should_end_session function when building the response.
Now over to the handler for the Yes intent, In this handler we will create a random number and store it in the session attributes.
class YesIntentHandler(AbstractRequestHandler):

  def can_handle(self, handler_input):
      return is_intent_name("AMAZON.YesIntent")(handler_input)

  def handle(self, handler_input):
      session_attr = handler_input.attributes_manager.session_attributes

      handler_input.attributes_manager.session_attributes["correct_number"] = random.randint(0, 11)
      reprompt = "Try saying a number."
      speech = 'Guess a number between 0 and 10.'
      handler_input.response_builder.speak(speech).ask(reprompt)
      return handler_input.response_builder.response
Here we will check if it’s the built-in YesIntent that is triggered, and if it is, then we handle it. The handle function will generate a random number and store it in the session attributes for us to use later. Once again, we use a reprompt phrase to keep the session open.
OK, so now we can open the skill and we’ll generate a random number for the user to guess when the user says he/she would like to play. Now let us implement our custom NumberGuessIntent.
class NumberGuessIntentHandler(AbstractRequestHandler):
  def can_handle(self, handler_input):
      return is_intent_name("NumberGuessIntent")(handler_input)


  def handle(self, handler_input):
    correct_number = handler_input.attributes_manager.session_attributes["correct_number"]

    filled_slots = handler_input.request_envelope.request.intent.slots
    number_slot_value = get_slot_value(filled_slots, 'number')
    guessed_number = int(number_slot_value)


    if guessed_number == correct_number:
        speech = 'Correct! Congratulations! Would you like to play again?'
        reprompt = "Do you want to play again?"
        handler_input.response_builder.speak(speech).ask(reprompt)
    elif guessed_number > correct_number:
        speech = '{} is to high, try again.'.format(guessed_number)
        reprompt = "Try saying a number"
        handler_input.response_builder.speak(speech).ask(reprompt)
    elif guessed_number < correct_number:
        speech = '{} is to low, try again.'.format(guessed_number)
        reprompt = "Try saying a number"
        handler_input.response_builder.speak(speech).ask(reprompt)

    return handler_input.response_builder.response


  def get_slot_value(filled_slots, slot_key):
    for key in filled_slots:
        logger.debug(key)
        if key == slot_key:
            return filled_slots[key].to_dict()['value']
            # return filled_slots[key]['value']
    return None
Let’s check the code for this handler. We check that the intent is the NumberGuessIntent in the can_handle function.
Let’s go through the handle function briefly to see what we do in that. We start by reading the correct, the generated random number, from the sessions attributes (as you remember, we generated this and stored it in the YesIntentHandler).
After we got the files_slots from the handler_input, we created a slot that we named number when we created the intent in the Alexa Skill console. I have created a helper function get_slot_value that loops through the slots and fetches the value.
When we have the correct and guessed number, we can create the phrase we want Alexa to say. If the user guesses the correct number, we congratulate them and ask if he/she would like to play again.
We then have to repeat everything and implement and handle the rest of the intents we specified when creating the skill. The logic for it follows the same pattern, so I will not show that here. What we must do, however, is to add the intent handlers to a SkillBuilder class and expose the Lambda handler. Otherwise the call to the Lambda function will fail. So let’s go ahead and do just that.
# Skill Builder object
sb = StandardSkillBuilder(
    table_name="guess-the-number", auto_create_table=True)

# Add all request handlers to the skill.
sb.add_request_handler(LaunchRequestHandler())
sb.add_request_handler(YesIntentHandler())
sb.add_request_handler(NumberGuessIntentHandler())

# Expose the lambda handler to register in AWS Lambda.
lambda_handler = sb.lambda_handler()
So now we can deploy the Lambda function and then head back to the Alexa console and finish creating our endpoint setup.
Finish setup of the endpoint
So with the Lambda function ready, we can now finish the setup of the endpoint.
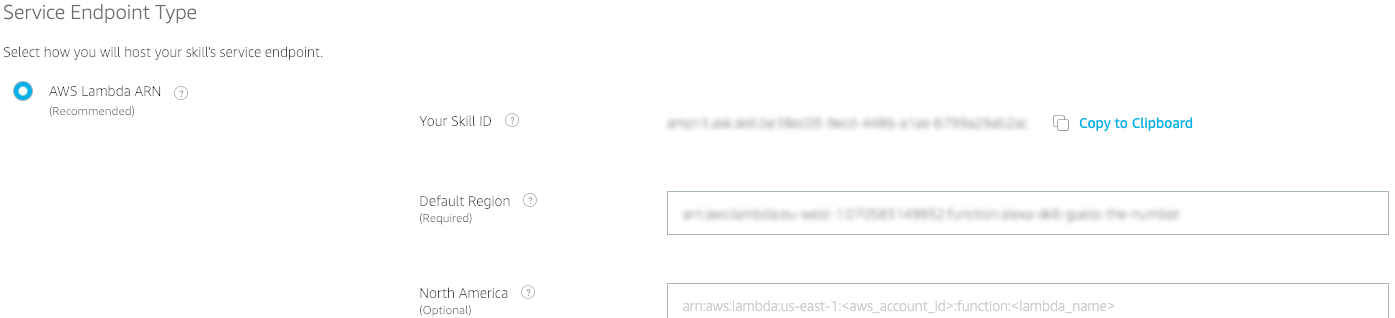
We navigate back to the Alexa console and select Endpoint in the menu to the left. We are going to use the AWS Lambda endpoint type, which is the recommended type as well. We are only going to use one default Lambda function and not create functions in multiple regions. If this was a worldwide Skill up for release, I would deploy the function in multiple regions to make sure the users get as good an experience as possible with low latency access. Copy the ARN from the function we just deployed and paste it in the default Lambda input.
Basically everything we need to start testing our skill is now in place, we just have to make sure we have saved and built the model. So we do that now, just press the save and build buttons that are available in the top.
What we could have done is to set up a UI for Alexa devices with screens. But for a very simple first skill, this would be sufficient.
Testing time
Time to start testing our skill switch to the test tab. There are three sections in the testing area: we have the “Alexa Simulator”, “Manual JSON”, and “Voice & Tone”. In the Voice & Tone section we can try out SSML and see how it will sound. This is a fast way to try out your changes to voice, speed, tone, breaks, and other SSML tags.
What we will focus on is the Alexa Simulator, here we can type or speak phrases and see how our skill reacts. To open our skill, just type or say “Alexa, open ‘{invocation name}“ (in my case this would be “Alexa, open Guess the Number”). Alexa will then respond with both text and speech to our input. So in this mode, we can test back and forth and see what happens. In the JSON output section, we can also see our session attributes and how they change and update.
Conclusion
We have now built our very first, very simple Alexa skill. For me, there will definitely be more of them, I might even publish one or two.
As Werner Vogels would say, “Now go build”!
Originally posted on my personal blog.