
How it all started
Friday afternoon, Covid-19 still going around, my phone rings. It is one of the kids with one of the most dreaded questions one can get: “Can we have the password to the router?”
“Why?”, I manage to say before being interrupted. “We found this video on YouTube about running your own Minecraft server. They even tell you how to open up your network !!”
Shivers are running down my spine. No way am I going to let some YouTube channel dictate my router configuration. Can’t this be done in the cloud?
I pride myself being vendor agnostic with certifications for all three major vendors. As my current assignment involves Azure, I head to that portal to see what I can do. I want it to be simple, cheap and without me being involved when it is up and running.
Let me show you what I did, how I did it and give you some ideas of how you can improve upon it.
Don’t expect me to take your hand; I am assuming some basic experience in Azure. Do you prefer GCP or AWS, I’m sure you’ll be able to reach the same results there. As I haven’t worked with Logic Apps, this is what I am heading for (looking for a challenge and learning opportunity).
You will be able to build this yourself in 45 minutes.
Creating the Minecraft server
First, we create a resource group. I call mine ‘Minecraft’. Select a location close to you in order to have low latency to the server. (I didn’t follow Azures recommendation in naming this time, rg-minecraft would be their recommendation.)
Now it is time for a virtual machine. Calling mine ‘Minecraft-vm’, running Debian 10 on a B1ms instance (2GiB is minimum). I selected Debian as it is my preferred choice for server infrastructure, but you can pick your own preferred OS (note that Windows is a bit more memory heavy).
As we wanted it as cheap as possible, I picked the Standard HDD disk. Don’t forget to pick a public IP and select advanced for the security group (best practice i.m.h.o.).
Don’t skip ‘Management’ when creating the VM. We want to enable ‘Auto-shutdown’ so the server shuts down itself when the kids are known to be sleeping. This in case they forget to shut-down the server after playing.
While your VM is being deployed, let’s configure the Minecraft-vm-nsg and open up port 25565 for all incoming traffic. This is the port the Minecraft server is listening to.
While at it, set your public IP to static so that we always have the same IP address. This makes life easier in the beginning.
Once the VM is deployed, we install Minecraft. If you use a Debian / Ubuntu based OS, you can do something similar as me:
sudo apt-get update
sudo apt-get upgrade
sudo apt-get install default-jdk
mkdir server
cd server
wget <url>
The correct URL for the latest Minecraft server can be found online: https://www.minecraft.net/en-us/download/server/
Now it is time to start the server for the first time. If you forgot to edit the eula.txt file, then you will get a warning. Note that I adjusted the memory settings, 1700M on my 2GiB servers seems to run fine and I have some memory left for other processes.
java -Xmx1700M -Xms1000M -jar server.jar --bonusChest --nogui
Note that this can take a bit longer the first time. Subsequent starts tend to be faster.
As we want the server to start automatically when we start the VM, we add the following line to Crontab ( crontab -e ). Make sure it is all on the same line.
@reboot cd /home/minecraft/server && /usr/bin/java -Xmx1700M -Xms1000M -jar server.jar --bonusChest --nogui
At this point I rebooted the server to see if everything worked as planned.
Starting and stopping the server with Logic Apps
In principle we are done now. The Minecraft server is working and playing can begin. But didn’t we say we wanted to make it as cheap as possible?
I really don't want to start and stop the server manually whenever the kids want me to. Don’t want to provide others access to my Azure subscription either. Conclusion, we need some easy management interface.
Let’s go back to the Azure portal and create in our resource group a Logic App. I’ll call it ‘startMinecraftServer’. We want our Logic App to be triggered by a HTTP request. The button to do so currently looks like below, but I expect this to change in the future.
 In the designer that opens, we see the following image:
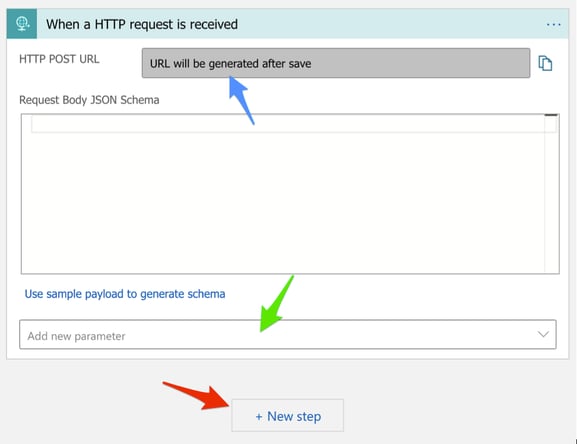 First, we will make sure the trigger works for GET requests as well. We need to add a new parameter (green arrow). Select ‘Method’ and then ‘GET’. This will do the trick.
Now save your design, and an URL will appear at the blue arrow. We’ll need that later.
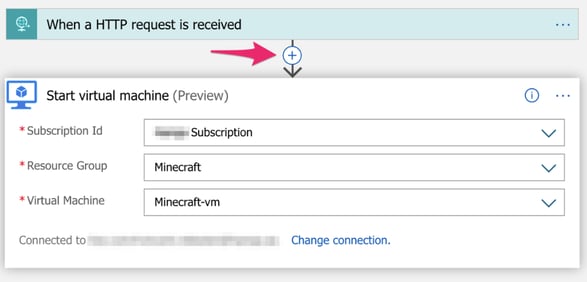
Then we add a new step (red arrow). Search and select for ‘Azure VM’. You will see a number of actions to select from. We pick ‘Start Virtual Machine’. We’re lucky, this is relatively new in Azure and still in preview at the time of writing.
You might be asked to login once again. Not sure why, but it is only needed once. Select your subscription, resource group and virtual machine. It will look something like this:
 Now don’t forget to save your changes. If you didn’t copy the URL at the blue arrow earlier, now it is time to do so.
Stop the VM and go to your favorite web-browser. Past in the URL and press enter. Nothing happens in your browser but check your VM in the Azure portal. If all went right, it is now starting.
Let’s make it a bit more user friendly. Click on the plus with the red arrow in the image above. Search and select the action ‘Response’ which has ‘request’ written below it. Your Logic App will look then as follows.
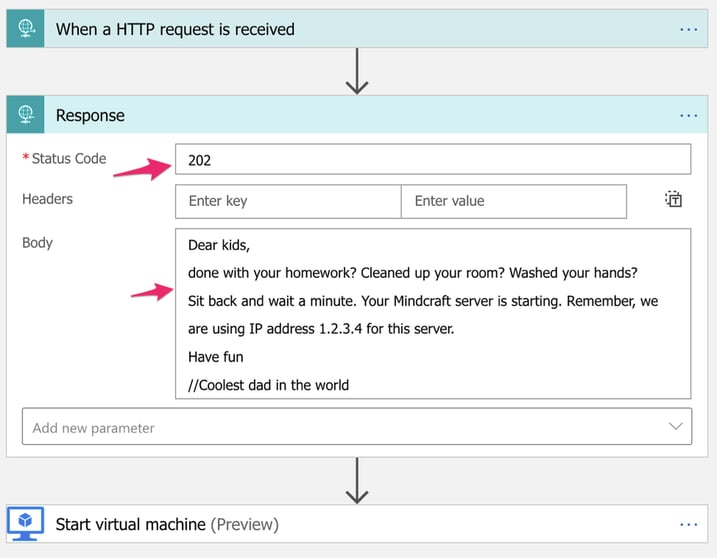 Add response code 202 (The request has been accepted for processing, but the processing has not been completed) and some informative text for the user. (Don’t forget to push save.)
As we wanted this solution to be as cheap as possible, let’s create a Logic App for shutting down the VM as well. Create a new Logic App, I call mine ‘stopMinecraftServer’.
Follow the steps above. But now instead of ‘Start Virtual Machine’ we select ‘Deallocate Virtual Machine’. Note that when you select ‘Power off Virtual Machine’, you are still paying for the resource. When deallocating, charging stops and that is what we are after.
That’s all. We have now two URLs to start and stop the server. We’re only paying for the time the server runs and we have built in a safety that the VM is stopped when the kids are in bed.
Improvements
Not liking the long URL? Neither did I. You can use a URL shortening service or if you have access to a server and domain name then you can easily create a redirect. I have the latter so I used that.
Suppose you are running Apache, create a sub-domain like minecraft.example.com. Now add code like the following to your Apache configuration (I’m expecting you to be familiar with Apache configuration and adapt accordingly to your setup):
<VirtualHost *:80>
DocumentRoot /var/www/html
ServerName minecraft.example.com
RedirectMatch ^/start <Logic App Start URL>
RedirectMatch ^/stop <Logic App Stop URL>
<Directory />
deny from all
</Directory>
</VirtualHost>
We can now start and stop the server with simple commands:
http://minecraft.example.com/start
http://minecraft.example.com/stop
Can’t get enough? Here a few things you can try to do as well. I’ll leave it as a challenge to you.
- Instead of a static IP, use a dynamic IP and inform the users about the new IP once it is allocated.
- Implement some kind of security so that not everybody can start/stop the server.
- Send an Email when a server is started and stopped
(Tip: SendGrid has a Logic App component you can use.) - Introduce some kind of security so that e.g. a password is required to start the server.
- Instead of Cron, use /etc/init.d to start and stop your server
(more advanced, but better control over the process) - Start your Minecraft server with with screen -d -m so you can have access to the Minecraft command line (bit more advanced, but must-have knowledge for Linux users)
Costs
And what does this cost? I promised cheap, so here is a rough breakdown.
Logic Apps are charged per invocation and are in principle free of charge considering the low number of invocations we are going to have.
The HDD we selected is 13.43 SEK / Month (1.28 Euro)
The VM and dynamic IP are billed per usage. IP is 0.035 SEK / Hour (0.0033 Euro) and the current VM costs 0.1984 SEK / Hour (0.019 Euro). This totals to 0.2334 SEK / Hour (0.022 Euro).
Let’s assume the server is running 50 hours per month (8 playing sessions of 5 hours). This would be a total monthly bill of around 25 SEK (2.38 Euro) or 50 öre per played hour (4.8 Euro cents).
Conclusion
We managed to build a Minecraft server in less than an hour without the need of any coding skills. Starting and stopping the server is as easy as visiting a webpage.
The price for running the server is neglectable, the dad-cool factor for having an ‘own’ Minecraft server for the kids is priceless.
Hope you enjoyed the little walk-through.
// Vincent


